Many enterprises are now using MS Teams as their main communication and collaboration tool. For data engineering teams, it would be incredibly useful if messages related to the execution of a data pipelines would appear instantly in a Teams channel. Not only does this save people’s email inboxes filling up unnecessarily, but it also encourages collaboration between engineers when fixing the data pipeline.
With Matillion, it is easy to automatically create alerts in Teams, using webhooks. This article firstly shows you how to do the easy one-time configuration to enable messaging in Teams based on scheduled orchestration job failures. The primary benefit of using webhooks in this scenario is that it will automatically work for all newly developed pipelines added to a given schedule without requiring further manual configuration. This article then takes you through some further examples about how you can configure more granular messages embedded in specific places within an orchestration job itself. These latter alerts can be made conditional, based on the outcomes of the executed steps in the job.
A webhook is a mechanism used in web development and online services to enable real-time communication and data exchange between different applications or systems. It allows one application to send automatic and immediate updates or data to another application when specific events or triggers occur. Webhooks are typically implemented using HTTP POST requests, making them a simple and efficient way to transmit information.
Step 1: Configuring Webhooks in Teams
In order to allow Teams to receive webhook payloads from Matillion, we must first configure a Teams channel to receive webhooks. Firstly, choose your desired Team, I will be going with ‘Snap IT’. Within the chosen Team, we advise you create a new channel to receive the Matillion alerts so that it does not clog up an existing channel and allows users to personalise how they receive their notifications. I have created a channel called ‘Matillion Alerts’.
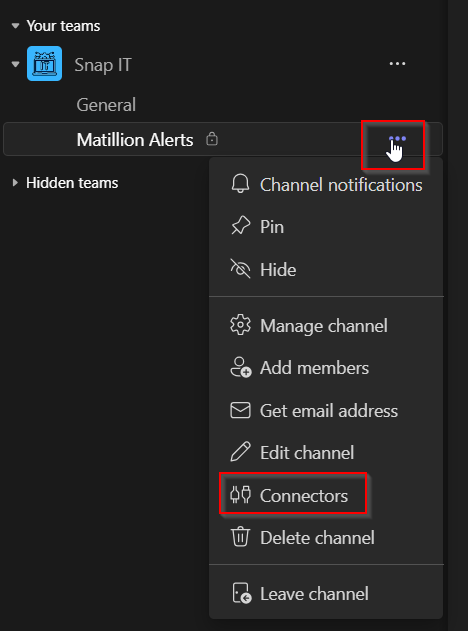
Select the three dots on your new channel and click ‘Connectors’. Note that there will be access restrictions for standard users so you may need to be an owner of the Team or contact your platform administrator in order to reach the Connectors view.
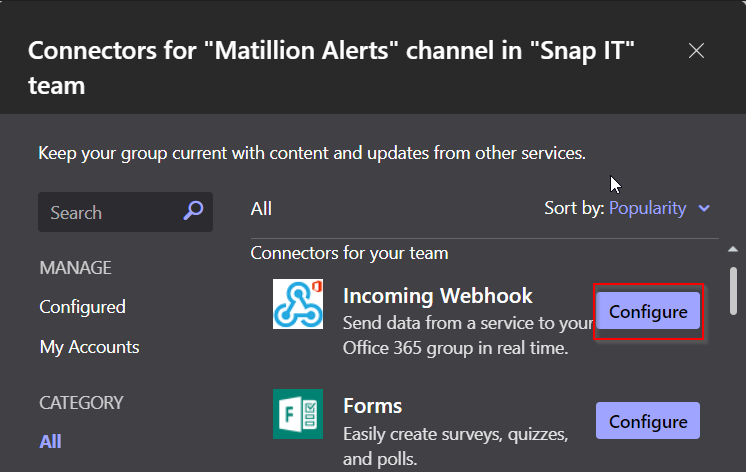
From here, select ‘Configure’ on the Incoming Webhook connector, you may need to search for it. Also note here that your platform administrator may restrict what connectors are available to you, and if so, contact them to have the Incoming Webhook connector enabled.
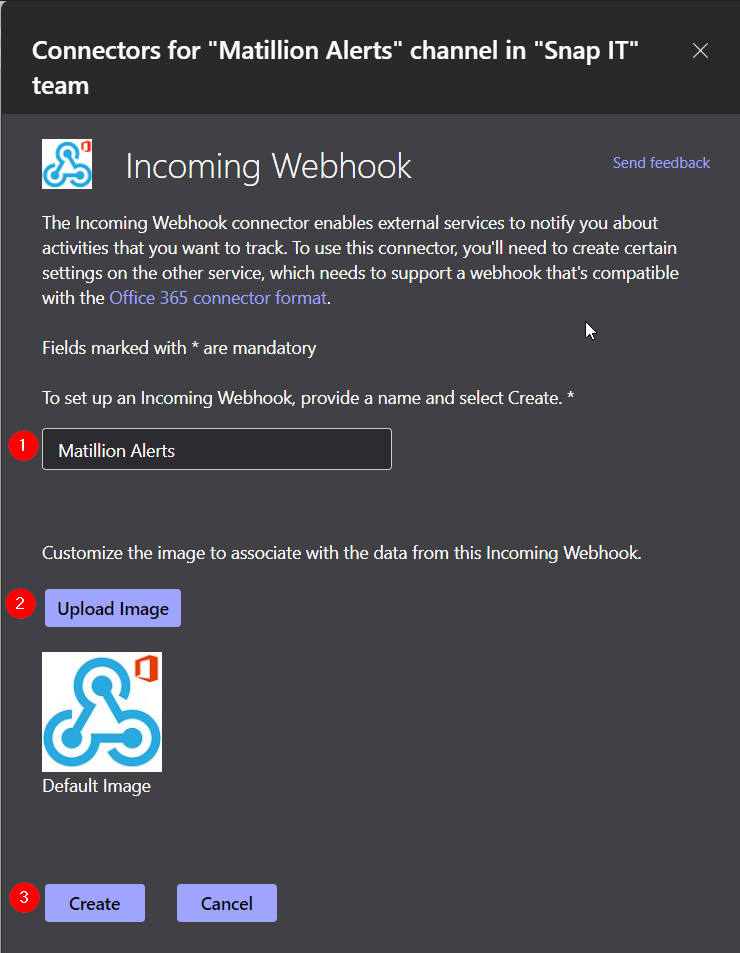
Provide a name and optionally an image for the webhook configuration. These will be the display name and profile picture used for the channel posts and can be modified at any time. Once filed out, select ‘Create’.
You will be presented with a URL, copy this and save somewhere as you’ll need it later. If you lose this, it can be retrieved by navigating to the webhook configuration screen.
Step 2: Creating a Webhook Payload
Before we can start to send webhook alerts for schedule failures to Teams channels, a webhook payload must be configured in Matillion. This defines the data structure that will be sent to Teams and allows us to pass in dynamic variables about the specific event (i.e. a job failure). Note that creating a payload is recommended for Configuring Schedule Failure Alerts in section 3 below but is optional if using webhooks for ‘Conditional alerts based on component outcomes’ in section 4 below.
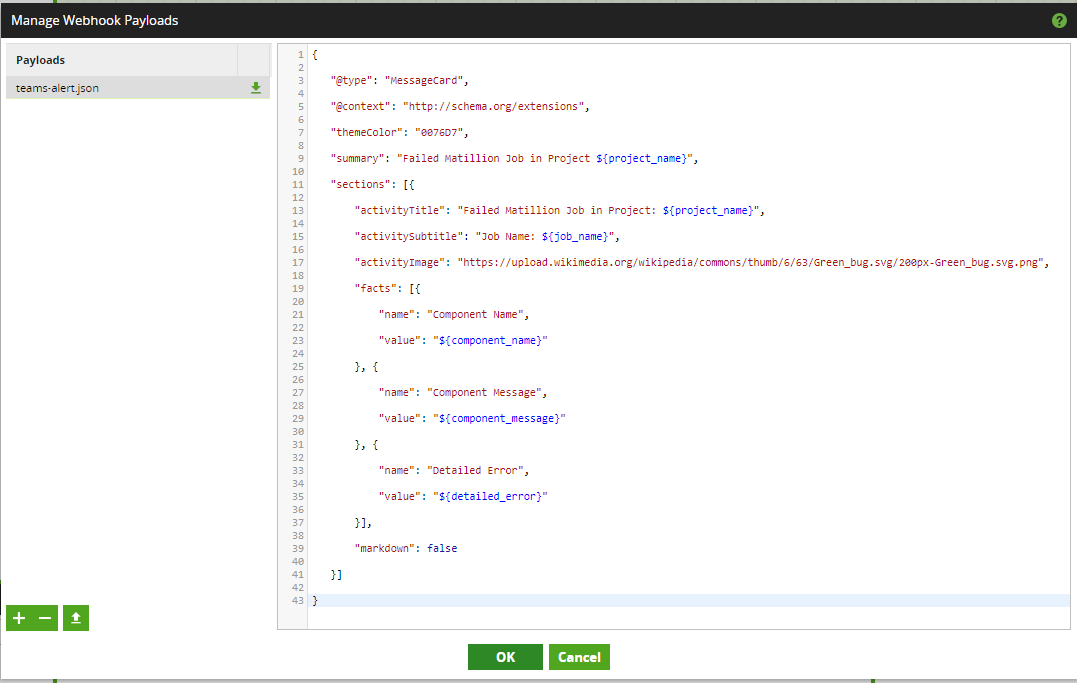
In Matillion, navigate to the project you would like to use webhooks in and navigate to the ‘Manage Webhook Payloads’ window from the Project menu (in the top left of the UI).

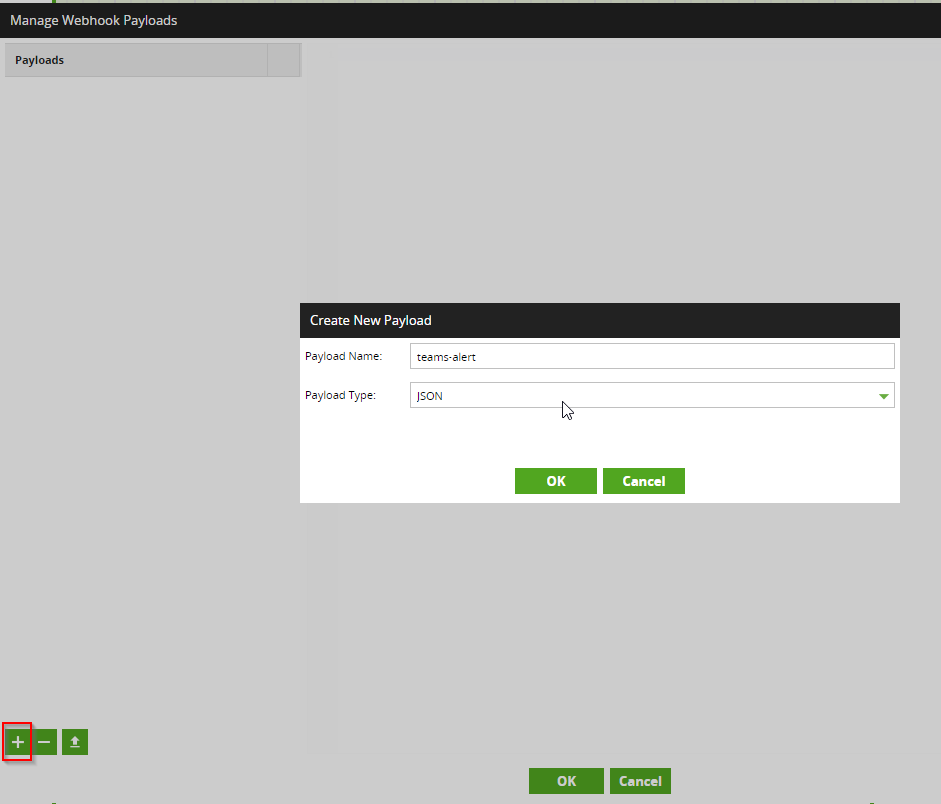
To add a new payload, select the ‘+’ in the bottom left of the popup and enter a payload name, leave the type as ‘JSON’ and select ‘OK’.
I suggest using the payload below as it provides the essential information for a component failure in a presentable format for a Teams channel message:
{

   "@type": "MessageCard",

   "@context": "http://schema.org/extensions",

   "themeColor": "0076D7",

   "summary": "Failed Matillion Job in Project ${project_name}",

   "sections": [{

       "activityTitle": "Failed Matillion Job in Project: ${project_name}",

       "activitySubtitle": "Job Name: ${job_name}",

       "activityImage": " https://upload.wikimedia.org/wikipedia/commons/thumb/8/84/Flat_exclamation_icon.svg/640px-Flat_exclamation_icon.svg.png",

       "facts": [{

           "name": "Component Name",

           "value": "${component_name}"

       }, {

           "name": "Component Message",

           "value": "${component_message}"

       }, {

           "name": "Detailed Error",

           "value": "${detailed_error}"

       }],

       "markdown": false

   }]

}
Enter the above payload into the text editor and select ‘OK’.
Step 3: Configuring Schedule Failure Alerts
Matillion schedules are a way to automatically run your Matillion pipelines a specified cadence such as every morning at 1am. Assuming you already have a schedule set up, navigate to the ‘Manage Error Reporting’ window from the Project menu (in the top left of the UI).

Here we can configure the webhook error reporting settings. I strongly suggest not enabling ‘Manual Runs’ as this sends webhook payloads (and therefore Teams alerts) not just for run failures, but every time a job fails a validation, which will be very irritating during development. You will need to enable ‘Scheduled runs’ in order to receive schedule failure alerts. Paste in the URL we obtained from the end of the ‘Configuring Webhooks in Teams’ section into the ‘Webhook URL’ property. Select the payload we configured in the ‘Creating a Webhook Payload’ section in the ‘Payload Template’ property.
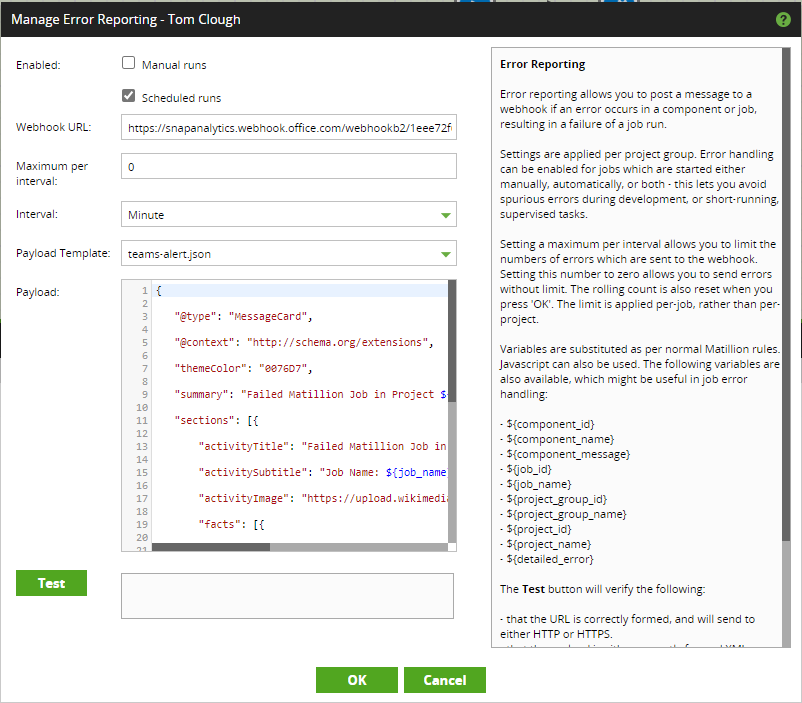
I suggest pressing ‘Test’ and checking that you receive an alert in your Teams channel as expected.
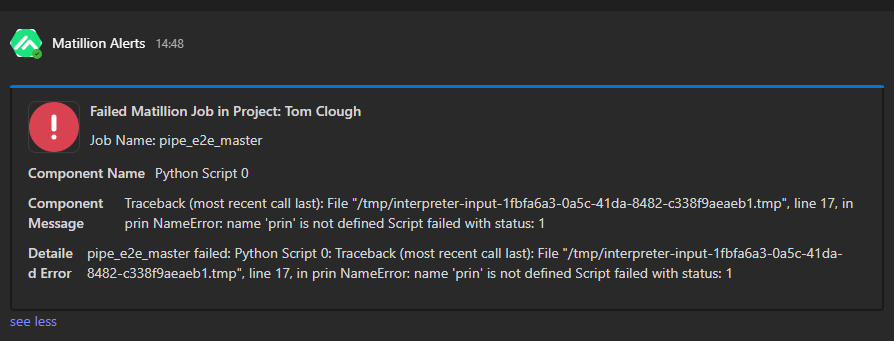
Once configuration is complete, in the event of a schedule failure, a Teams message will appear in your configured alerts channel similar to:
Examples: Conditional Alerts
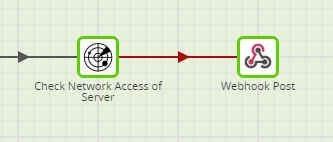
Optionally, the ‘Webhook Post’ component can be used for more granular control over sending webhook payloads compared with using the ‘Manage Error Reporting’ functionality covered in section 3 above. This approach provides more flexibility to send webhook payloads in specific scenarios. Here are some example situations where this component may be useful.
We’ve already discussed configuring alerts for schedule failures in section 3, but there may be scenarios where we want alerts to confirm successful schedule runs. In this scenario we can attach a Webhook Post component at the end of our scheduled pipeline with a conditional success flow to send an alert with a custom message such as “The daily schedule on 10/09/2023 was successful”. This provides visibility to the data platform team without the need to switch on the Matillion VM and check.

Another use case for this component could be to send a Teams alert when a flat file data source doesn’t send any files on a particular day. This may not necessarily require flagging the job as a failure if this is a possible outcome, but alerting the data platform team to provide visibility of this could lead to identifying silent issues sooner rather than waiting for the data consumers to raise the issue. An if component can be used to check if 0 files were staged and if true, can trigger the Webhook Post component.
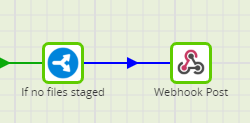
Another use case for this component could be to send a Teams alert when a flat file data source doesn’t send any files on a particular day. This may not necessarily require flagging the job as a failure if this is a possible outcome, but alerting the data platform team to provide visibility of this could lead to identifying silent issues sooner rather than waiting for the data consumers to raise the issue. An if component can be used to check if 0 files were staged and if true, can trigger the Webhook Post component.
Final thoughts
It is worth noting that it is possible to tag people using webhook payloads. However, as of 10/09/23, it does not seem possible to tag channels which would be more useful. Once you have Teams alerts configured using webhooks, the benefits are clear. Data platform teams can instantly be made aware of failures and also warned of any potential issues so that they can be resolved swiftly in order to reduce the impact to data consumers. I hope this article helps improve your data platform monitoring capabilities. Please feel free to reach out to me on LinkedIn or drop a comment on this blog if you have any further questions.

